Quantcast
Channel: Products – Thonk – DIY Synthesizer Kits & Components
Viewing all 525 articles
Browse latest View live

Division 6 – Business Card Sequencer – PCB + Chip

$
0
0


Note: This is a single PCB & Programmed Firmware Chip, for Full DIY Kit go here

Connectivity

Power In: 7-15VDC, tip positive (Don’t reverse it or it will get mad). Just find a voltage source on your synth somewhere. If the notes being played by the sequencer seem flat, the power supply you have chosen may be dropping too much under load. If you can’t or don’t want to use your synth to power the sequencer, you can use a 9V Battery or AC power supply.

Clock In: 0-5V is ideal, but going outside that range won’t hurt it. Step will advance on rising edge.

CV Out: 1 volt/octave, C=1V/2V/3V. Connect to the CV in on your oscillator (or filter or whatever)

Gate Out: On=+5V. Plug this into your VCA, EG, etc. Gate timing follows the clock when the sequencer is running, buttons when in Ready mode, and stays on while programming.

Operation

Push Run to start playing a sequence. The true green Run LED will light to tell you that you are in Run mode. Push it again to Pause. The sequencer steps can be programmed while paused.

Push reset to stop the sequence, go to step 1, and enter Ready mode. The blue step LED will blink to let you know that you are in Ready mode. This means that when you press Run again, the sequencer will play step 1 on the next clock pulse instead of skipping it and going to step 2.

If you want to start on a different step, you can use the step left and right buttons to pick a different one.

While in Ready mode, you can use the note buttons to manually play tunes without messing up the sequence you have stored in memory. Gate timing will follow your button presses.

Programming is done while the step LED is steady (not Ready mode) and the sequencer is not running. You can enter Programming mode by pressing Reset a second time, or pausing a sequence with the Run button. Use the step left/right buttons to pick which step you want to program, then press the note you want that step to play. The new note is automatically stored in non-volatile memory.

Remember about the step LED:

Blinky = Ready Mode = Will start on selected step = Can play keyboard live
Steady = Programming = Any notes you push will get saved in that step
The sequencer keyboard covers 3 octaves, so you can use the octave up/down buttons to transpose the keyboard up and down. The green and orange LEDs will tell you which octave the keyboard is currently set to.

In addition to standard notes, you can also program a Rest or a Loop command into a step. A Rest step holds the previous note and doesn’t fire the gate. Loop makes the sequencer go back to step 1. You can use this to create any length sequence you want. For example, if you only want steps 1-13 in your sequence, you would make step 14 a Loop step.

Starting with firmware version 1.1, the sequencer operates with a built-in clock from power-up until it receives its first external clock pulse. The internal clock rate can be adjusted up and down while the sequencer is running using the step buttons. Once the unit has switched to external clock mode, the internal clock can be restored by holding down the reset button for about 2 seconds (soft reset) or removing/restoring power to the unit.

Build Document & BOM – Sequencer Build Doc

4ms SCM & SCM Breakout – Panel / PCB set

$
0
0

This page is for purchasing the PCB and Panel for the SCM & SCM Breakout ONLY, the only part included is the Programmed firmware chip with the SCM PCB.

I am not providing part sourcing support for these builds. You should be confident you can source these parts yourself from the documentation below. I do sell the PJ302M, PJ301BM and Thonkiconn jacks that are required however.

This is an intermediate-level kit. You should be confident in your soldering skills, and have a basic familiarity with electronic components.

The SCM is an ingenious clock multiplication device with very funky shuffle and slip features.

Documentation


scm_pcb

Music Thing Modular – Radio Music PCB + Options

$
0
0

All PCB sets include the Micro SD Card slot component FREE

This is not a full kit, if you want a full kit go here.

Sd_card_slot

This is the only hard to find component required for Radio Music. Note you still need to purchase an MicroSD card! The very cheap $1 type cards are not worth the trouble they will cause you, we highly recommend SanDisk MicroSD cards. Easily available from any camera or computer stores, eBay or Amazon etc.

The options available for the partial kit are:

  • 4hp Eurorack Panel
  • Switch (7 different button colours)
  • Teensy 3.1 – Built by PJRC in the USA
  • 2 x Black Davies 1900h Clone Knobs
  • 2 x Alpha Vertical 50K Linear pots
  • 10 x Thonkiconn jacks (this is the smallest quantity I sell)

Full project details and documentation here – http://github.com/TomWhitwell/RadioMusic/

NOTE – you need to purchase a MicroSD card and a Micro-B USB Cable elsewhere to set up this module. The Micro-B cables are the smallest type shipped with Kindles and many Android phones. You also need a card reader to write files to the SD card, many laptops and desktops already have them built in now. – Read the setup and build documentation here.


[soundcloud url=”https://api.soundcloud.com/tracks/179087720″ params=”color=ff5500&auto_play=false&hide_related=false&show_comments=true&show_user=true&show_reposts=false” width=”100%” height=”166″ iframe=”true” /]

[soundcloud url=”https://api.soundcloud.com/tracks/178913178″ params=”color=ff5500&auto_play=false&hide_related=false&show_comments=true&show_user=true&show_reposts=false” width=”100%” height=”166″ iframe=”true” /]

[soundcloud url=”https://api.soundcloud.com/tracks/178913184″ params=”color=ff5500&auto_play=false&hide_related=false&show_comments=true&show_user=true&show_reposts=false” width=”100%” height=”166″ iframe=”true” /]

Erica Synths ‘Polivoks VCF II’– DIY Partial Kit

$
0
0


Note: This partial DIY kit contains the following parts only:

  • Polivoks VCF II PCB Set
  • Polivoks VCF II Eurorack Front Panel (10HP)
  • 2 x K140UD12 Russian ICs

The Polivoks Filter is famous for its’ crazy resonance sweeps and deep low-end sound which makes it ideal for acid-style basslines. We believe this is one of most is one of most authentic sounding Polivoks VCF emulations available. The original Russian ICs K140UD12 are used in the audio circuit and there are several design updates which adapt the Polivoks VCF II for contemporary modular synth demands.

Updates include:

  • Independently buffered inputs
  • Extended Cutoff knob range
  • Eliminated clicks when switching filter modes
  • Output stage added to eliminate signal inversion

Features:

Switchable BP/LP modes
Inputs/outputs protected against over-voltage
Protection on reversed power supply
Skiff friendly design
Unique Polivoks character!

Polivoks VCF Build Document – Assembly Guide

Polivoks VCF BOM – Bill Of Materials

Technical specifications:

Input level up to 20Vptp
CV input level -10V – +10V
Filter modes BP(6dB/oct)/LP(12dB/oct)
Module width 10HP
Module depth 30mm
Power consumption 11mA@+12V, 11mA@-12V

Erica Synths ‘Polivoks EG II’– Panel / PCB Set

$
0
0


The core of the Envelope Generator II is borrowed from the famous Polivoks synthesizer, but features significant schematic updates: Eurorack standard positive gates, envelope amplitude, inverted envelope output, looping feature (looping on gate on). The EG II also features a bonus gate delay, which outputs a gate signal after the Attack stage – it’s then possible to chain up several (4-5) Envelope Generators, each with delayed gate to create evolving polyphonic synth-like pads!

Features:

Full ADSR envelope
Direct and inverted envelope outputs
Gated and independent looping modes
Gate delay (after Attack stage) output
Skiff-friendly design

Polivoks EG II Build Document: Assembly Guide

Polivoks EG II BOM – Bill Of Materials

Envelope amplitude
0…10V
Attack time
0…3”
Decay time 0…12”
Sustain level 0…10V
Release time 0…12”
Power consumption 23mA (+12V), 17mA (-12V)
Panel width 8HP
Module depth 30mm
Power consumption 20mA@+12V, 10mA@-12V

Erica Synths ‘Polivoks VCA II’– DIY Partial Kit

$
0
0


Note: This partial DIY kit contains the following parts only:

  • Polivoks VCA II PCB Set
  • Polivoks VCA II Eurorack Front Panel (8HP)
  • 2 x K188UD1 ICs
  • PCB Connectors

The Polivoks VCA II has a distinctive architecture – two differential opamp (Russian ICs K118UD1B) based VCAs in series for LFO and ADSR control over signal amplitude independently. The control voltage to attenuation behaviour of this VCA is nonlinear and not logarithmic – it is kept authentic to the original response of the Polivoks. The circuitry of the VCA have been improved to achieve: higher dynamic range, better reliability, lower noise, accept higher signal levels, keep consistent behaviour, self-tuning of two internal offsets, and higher linearity. The audio signal path has also been redesigned so that you can use it as two independent VCAs or two VCAs in series like the original Polivoks.

Features:

Single or Dual VCA mode
CV level adjustment for each VCA
Summed audio output (lower signal gain)
Skiff-friendly design

Polivoks VCA II Layout – Component Placement

Polivoks VCA II BOM – Bill Of Materials

Technical specifications:

VCA gain
1,2
CV level -10V…+10V
Attenuation@0V CV 80dB
Panel width 8HP
Module depth 35mm
Power consumption
24mA@+12V, 18mA@-12V

Erica Synths ‘Output II’– DIY Partial Kit

$
0
0


Note: This partial DIY kit contains the following parts only:

  • Output II PCB Set
  • Output II Eurorack Front Panel (6HP)
  • Pre-soldered headphone preamp chip
  • PCB Connectors & Spacer
  • 2 x 3.5mm stereo jacks

The Output II module allows you to easily interface your modular synth with external gear such as mixers or other synthesizers. The module features L and R inputs for stereo patches – for mono patches the R input is normalled to the L input, so you can automatically route the output to a stereo mixer. There is also a high quality headphone preamp on board with dedicated level control.

Features:

Left and Right inputs
3.5mm stereo output jack
3.5mm headphones jack
Headphones volume adjustment
Skiff-friendly design

Output II Build Document – Assembly Guide

Output II BOM – Bill Of Materials

Technical specifications:

Audio output amplitude
line level (optionally adjustable)
Panel width 6HP
Module depth 35mm
Power consumption 20mA@+12V, 7mA@-12V

Erica Synths ‘Midi-CV II’– DIY Partial Kit

$
0
0


Note: This partial DIY kit contains the following parts only:

  • Midi-CV II PCB Set
  • Midi-CV II Eurorack Front Panel (6HP)
  • Pre-Programmed Controller Chip
  • PCB Connectors
  • Glide Potentiometer

The Erica Synths MIDI-CV II is a compact, highly accurate and easy to use duophonic MIDI interface.

It emulates classical monophonic and duophonic synth behaviour, and can also be configured for use as two independent MIDI channels. Bonus features include MIDI clock output and an analogue glide circuit for both channels.

Features:

Two CV and Gate outputs
Configurable MOD output – modulation wheel or velocity
Analogue glide on both MIDI channels
One or two MIDI channel configuration
One or two voice switch

Midi-CV II Build document – Assembly Guide

Midi-CV II BOM – Bill Of Materials

Technical specifications:

CV range
0-8V
Max CV deviation 0.001V; 1cent
Gate and Clock level 5V
Glide time 0 – 2”
Module width
6HP
Module depth 35mm
Power consumption +40mA, -9mA

Erica Synths ‘Modulator II’– DIY Partial Kit

$
0
0


Note: This partial DIY kit contains the following parts only:

  • Modulator II PCB Set
  • Modulator II Eurorack Front Panel (8HP)
  • S&H Chip
  • PCB Connectors

The Erica Synths Modulator features a single LFO with simultaneous triangle and square wave outputs alongside a clockable Sample & Hold with external CV input and noise source. Each kit comes with two versions of noise generator – simple, transistor-based and more complex Zener diode-based – able to produce full-spectrum white noise. The Modulator is a 35mm deep, skiff friendly and has solid mechanical construction that doesn’t require any wiring.

Features:

LFO with triangle and pulse wave outputs
Choice of transistor-based or Zener diode-based noise generator for massive, full spectrum white noise
Sample & Hold circuit based on rare, high quality S&H chip
Sample & Hold CV and clock inputs

Modulator II Build document – Assembly Guide

Modulator II BOM – Bill Of Materials

Technical specifications:

LFO output amplitude -5V…+5V
LFO frequency range 0,1…20Hz (configurable)
Noise output level 10Vptp
S&H CV input level up to 20Vptp
Panel width 8HP
Module depth 35mm
Power consumption 27mA@+12V, 22mA@-12V

Erica Synths ‘Polivoks VCO II’– DIY Partial Kit

$
0
0


Note: This partial DIY kit contains the following parts only:

  • Polivoks VCO II PCB Set
  • Polivoks VCO II Eurorack Front Panel (12HP)
  • Matched Transistor IC’s
  • PCB Connectors & Spacer
  • 5 Position Rotary Switch

The Polivoks VCO II features the same core VCO of the famous Russian Polivoks Synth but with a number of new improvements. The exponential converter circuit uses the same matched transistor IC’s that were used in the original Polivoks. New improvements include:

  1. +-10V regulators for greater stability of operation,
  2. signal amplitudes adjusted to match requirements of contemporary modular synths – all output signals are also available simultaneously
  3. CV inputs redesigned to accept positive CV signals
  4. PWM circuit with manual and voltage controlled pulse width
  5. Sync input, so you can synchronise the Polivoks VCO to another VCO in your system.

Features:

Simultaneous Triangle, Saw and Pulse wave outputs
Manually adjustable and CV controlled pulse width modulation
Tracking across 8 octaves
Exponential FM input with dedicated attenuator
Synchronization input
5-Way Octave switch
Skiff-friendly design

Polivoks VCO II Layout – Component Placement

Polivoks VCO II BOM – Bill Of Materials

Technical specifications:

Audio output amplitude 10Vptp
Octave range C0 – C8
Panel width
12HP
Module depth 35mm
Power consumption 34mA@+12V, 36mA@-12V

Erica Synths ‘Mixer II’– Panel / PCB Set

$
0
0


Erica Synths DIY Mixer is a skiff friendly design that has solid mechanical construction and doesn’t require any wiring. It’s a simple, straight-forward audio mixer – an essential part of any modular setup.

Features:

Three AC coupled audio inputs
Two outputs
Skiff-friendly design

Note: this is a Panel / PCB Set only – for full kit go here

Mixer II Build Document – Assembly Guide

Mixer II BOM – Bill Of Materials

Technical specifications:

Mixer gain 1
Panel width 6HP
Module depth 30mm
Power consumption 4mA@+12V, 4mA@-12V

Sonic Potions ‘Penrose’ Quantiser Panel/PCB set

$
0
0

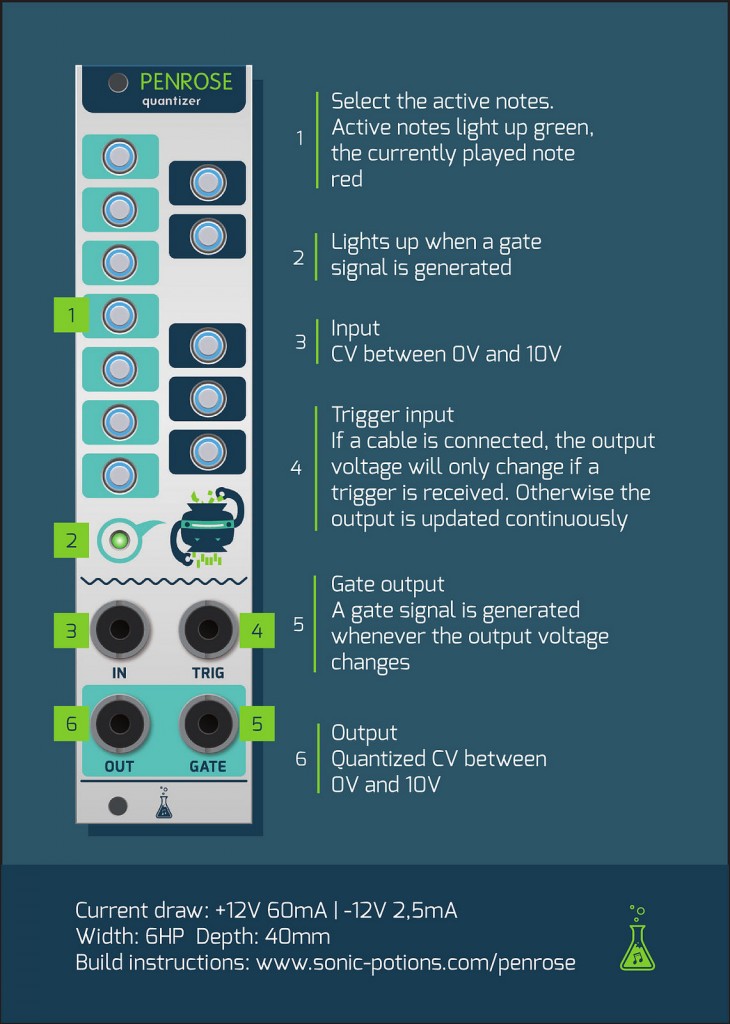
Penrose is a simple CV quantizer DIY kit for the eurorack format. It takes an incoming continuous CV voltage and converts it to the nearest note in a scale. Active notes can be selected with the 12 buttons. You can use it to tune the output of your analog sequencer, as a semi random melody generator, for fast chiptune arpeggios and much more.

This is an option to buy the Panel/PCB + Programmed Firmware Chip, support is not provided to help you source the other parts, read the documentation first before deciding if this project is for you.

The project is open source, so the schematic and source code is available.

Specs

Current draw: +12V 60mA | -12V 2.5mA
Width: 6HP Depth: 40mm
CV input voltage: 0-10V
CV output voltage: 0-10V

More information

Manual

Assembly guide

16222804951_934fa7fa55_h

Sonic Potions ‘Mal-2’ Random CV Panel/PCB set

$
0
0

Demos

Mal-2 is set to a slightly modulated random walk that controls a penrose quantizer playing a braids fold osc. The fold value is controlled by another Mal-2 module set to a slow random modulation. NAVA 909 makes the beats and syncs the quantizer and a sequencer playing the bassline on a saw OSC. Drum mutes are done by hand.

Overview

Mal-2 is a random signal generator mainly intended as CV modulation source. It has 2 modes of operation to provide you with smooth random goodness. Imagine Eris herself lends you a third hand to keep your patches interesting.

In the first mode the CHANGE knob morphs from a cubic interpolated (sine like shaped) random signal to a random walk function that could make a wallstreet broker delirious with joy.

In the second mode the CHANGE knob sets the self similarity. On the minimum setting the signal is completely random. On the maximum setting the random sequence is locked to a repeating, identical 8 step sequence. In between the sequence seamlessly morphs to new shapes over time.

This gives you a random CV where you can shape the bounds in which the chaos unfolds and goes far beyond a slew limited white noise.

This is an option to buy the Panel/PCB + Programmed Firmware Chip, support is not provided to help you source the other parts, read the documentation first before deciding if this project is for you.

Specs:

  • 6 HP
  • 12 bit CV output
  • through hole components
  • Random gate output
  • CV inputs with attenuverter for both knobs
  • super slow cycles times up to lower audio range
  • +12V 60mA | -12V 5mA


More information

Manual

Assembly guide

Sonic Potions ‘Penrose’ Quantiser Full DIY Kit

$
0
0

Penrose is a simple CV quantizer DIY kit for the eurorack format. It takes an incoming continuous CV voltage and converts it to the nearest note in a scale. Active notes can be selected with the 12 buttons. You can use it to tune the output of your analog sequencer, as a semi random melody generator, for fast chiptune arpeggios and much more.

It comes as a complete kit with all needed parts to build it. That includes a multi colour aluminum frontpanel, high quality jacks and illuminated bi-color push buttons.

The project is open source, so the schematic and source code is available.

Specs

Current draw: +12V 60mA | -12V 2.5mA
Width: 6HP Depth: 40mm
CV input voltage: 0-10V
CV output voltage: 0-10V

More information

Manual

Assembly guide

16222804951_934fa7fa55_h

Hexinverter Jupiter Storm Panel&PCB

$
0
0

This is the Panel and PCB only. You need to source all other parts.

Note. You need to create a bracket to mount the PCBs to the Front Panel, like this.

BOM, build notes, Manual and tech support here.

DIY support thread on Muffwiggler

jupiter promo


Zlob Modular – MiniAtt Panel / PCB set

$
0
0

A post shared by Zlob Modular (@zlobmodular) on

The Żłob Modular MiniAtt is a 2hp dual passive summed attenuator. Both channels of the MiniAtt have their own individual outputs and are also normalled to a sum output. The module also features individual toggle switches to turn each channel on or off. Due to the passive design of the module, there is a slightly lower signal out at the sum output than the individual outs. The MiniAtt is a great tool for performing and with DC coupled inputs it can handle CV or audio.

Note: this is a Panel/PCB Set only – for complete kit go here

MiniAtt Build Document – Assembly Guide

Specifications

  • Width: 2HP
  • Depth: 25mm
  • Panel: Aluminium – Black /Red
  • Power Consumption: Passive

Zlob Modular – MiniMix Panel / PCB Set

$
0
0

The Żłob Modular MiniMix is a 3 channel unity gain mixer in 2HP. Each channel has it’s own dedicated level control and can be used to mix either CV or audio signals. The MiniMix features a trimmer on the back of the module to adjust the overall gain of all 3 channels.
Note: The IC, trimmer and power filtering caps in this build are SMD, the rest of the components are all through hole.

This is a Panel/PCB Set only – for complete kit go here

MiniMix Build Document – Assembly Guide
MiniMix BOM – Bill of Materials

Specifications

  • Width: 2HP
  • Depth: 25mm
  • Panel: Aluminium – Black / Red
  • Power Consumption: +10mA, -10mA

Zlob Modular – Dual VCA Panel / PCB Set

$
0
0

The Żłob Modular Dual VCA is a two channel DC coupled OTA linear VCA. The 2 VCA channels are also summed together so it can be used as a voltage controlled mixer, or all 3 outs can be used separately and simultaneously. The design is based on the most recent revision of the VnIcursal VCA and has the same PCB offset trimmers for extra silent operation with zero bleed.

Note: This circuit pushes the limits of through hole design and the size constraints associated with 2HP – as such this module might have trouble fitting next to other modules with deep/wide circuit guts.

This is a Panel/PCB Set only – for complete kit go here

Dual VCA Build Document – Assembly Guide
Dual VCA BOM – Bill of Materials

Specifications

  • Width: 2HP
  • Max Depth: 60mm
  • Panel: Aluminium – Black / White
  • Power Consumption: +15mA, -15mA

Zlob Modular – Push VCA Panel / PCB Set

$
0
0

A post shared by Zlob Modular (@zlobmodular) on

The Żłob Modular Push VCA features two independent unity-gain DC coupled VCAs with LED push buttons to turn each channel on and off. A mix of both channels is available at the sum output, and all outputs can be used simultaneously. This is a very useful VCA for performative patches and can be used with either CV or audio signals.

Note: this is a Panel/PCB Set only – for complete kit go here

Push VCA Build Document – Assembly Guide

Specifications

  • Width: 2HP
  • Depth: 60mm
  • Panel: Aluminium – Black / Red
  • Power Consumption: +20mA, -20mA

Zlob Modular – VnIcursal VCA Panel / PCB Set

$
0
0

The Żłob Modular VnIcursal VCA is a 6 channel OTA-based linear VCA in 8HP. All 6 VCAs are routed to a sum output so it can be used as a mixer as well. Each channel can be removed from the sum and used independently by patching a cable into it’s own output. The signal inputs are DC coupled for use with both CV and audio and when CV is inserted into the CV jacks, the pots become attenuators for incoming voltage. The VnIcursal VCA also features PCB offset trimmers for ultra silent operation with zero bleed.

Note: this is a Panel/PCB Set only – for complete kit go here

VnIcursal VCA BOM – Bill of Materials

Specifications

  • Width: 8HP
  • Max Depth: 35mm
  • Panel: Aluminium – Black / Red
  • Power Consumption: +55mA, -55mA
Viewing all 525 articles
Browse latest View live